 Cybersecurity
 Email Encryption

Email Encryption with Office 365 / Exchange
Clemson University employees who use Office 365/Exchange email can now encrypt email messages and their contents before sending. Email message encryption helps ensure that only intended recipients can view message content. Clemson’s Office of Information Security (OIS) recommends that sensitive information not be transmitted via email. However, if sensitive information must be transmitted or requested via email, it should be encrypted. The encrypted email process must be initiated by the Clemson user in order to utilize this service.
For the best and most up-to-date user experience, please upgrade your Microsoft Office to the latest version available for download at 365.clemson.edu. This version provides a seamless experience for both Mac and PC users.
Clemson does not currently define rules to automatically encrypt messages.
But your email administrators can create and define some rules to automatically encrypt messages which meet certain criteria. For instance, your admin can create a rule that encrypts all messages sent outside your organization or all messages that mention specific words or phrases. When the defined criteria is met, encryption would be automatically applied.
However, if sensitive information must be transmitted or requested via email, it should be encrypted. Users working with sensitive information should follow the Minimum Security Guidelines set forth by CCIT.
Manually sending an encrypted message using Outlook
For PC users on Outlook:
-
-
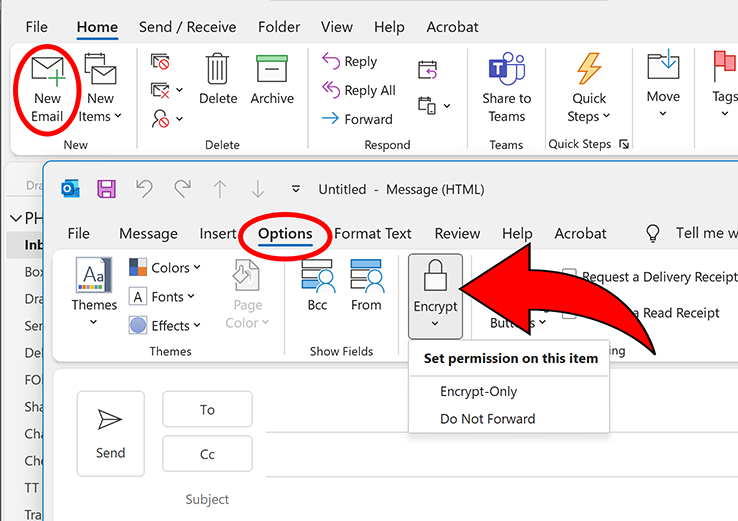
- Click the button for a New Email
- Then on your new email message,
select the Options menu and the Encrypt button
-
For Mac users, if you don’t see the Encryption option in your Outlook toolbar:
-
-
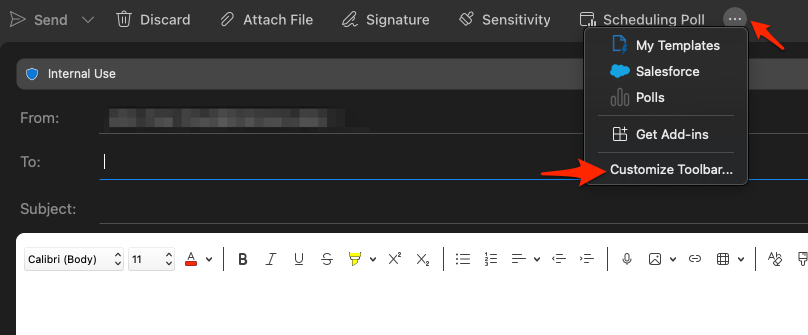
- Click the button for a New Message
- Click and choose Customized Toolbar
- Select and drag the Encryption icon to the toolbar on top and click Done
- On the Encryption menu, click Encrypt-Only
- Your new email message will now be encrypted
-
For Outlook Web App:
-
-
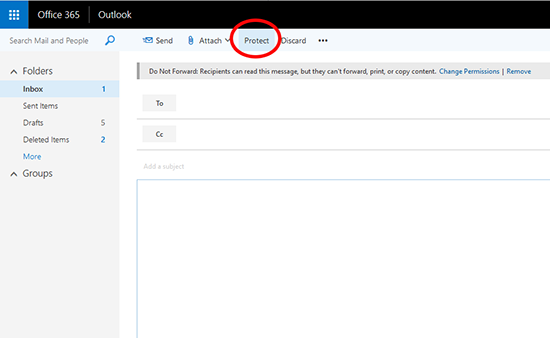
- Click the button for a New Email
- Then select the Protect option from the top menu
-
To view or reply to an encrypted email without Outlook
If your recipient is not using Outlook with Office 365, your encrypted email will instead just contain a link in the message body. And the recipient will need to follow the steps below (these instructions will also be provided in the email they receive).
-
- Click on the Read Secure Message button link in the email.
- They will be taken to an Outlook website where they must click another link which says Sign in with a one-time passcode.
- A new passcode will be emailed to the recipient’s email account.
- They will then enter that passcode in the Outlook website interface and click the Continue link.
- The recipient can then view the message in the Outlook web interface as well as reply and attach documents within this secure portal.
Each passcode expires after 15 minutes. If that happens, or if you can’t open the message for any reason, start over by opening the attachment again and following the steps above. In addition, the secure messages sent will always have the Clemson academic wordmark in the top left and the button will always say “Read Secure Message”. These have been modified from the default to help protect against copy-cat type emails.
If you need further assistance, please contact your local IT Consultant or the CCIT Help Desk at ithelp@clemson.edu